Mixing is a crucial part of music production that helps your tracks reach their full potential.
It can be a daunting task for beginners who often face challenges such as muddy or unbalanced mixes, making their tracks sound amateurish.
This guide provides you with actionable techniques that enhance the clarity, balance, and impact of your mixes. You will learn essential mixing tips, vocal mixing techniques, EQ and compression techniques, and insights on mixing drums and bass. Let’s get started.
Understanding the Basics of Mixing
What is Mixing in Music Production?
Mixing refers to the process of blending individual audio tracks together to create a cohesive and polished final version of a song. This involves adjusting levels, panning, applying EQ (equalization), compression, and adding effects.
The Importance of Mixing
Mixing achieves clarity by ensuring each instrument has its own place in the frequency spectrum. It provides balance to ensure no single element in the track overpowers the others. Moreover, it enhances the overall impact of the music, making it engaging and emotionally resonant.
Essential Mixing Tips for Beginners
Start with a Clean Workspace
Organizing your session is crucial. Name your tracks clearly, such as “Lead Vocal” or “Rhythm Guitar.” Use color coding to group similar instruments for visual ease, and create bus groups for drums, vocals, guitars, and other elements. This will make navigating your project easier and faster.
Set Proper Gain Levels
Gain staging is an important step in the mixing process. Ensure your individual tracks peak around -9 dB to -21 dB to prevent clipping and distortion during mixing. Utilize meters to monitor levels and adjust the pre-fader gain accordingly. Remember, a good mix starts with proper gain staging.
Use Reference Tracks
Utilizing reference tracks provides a professional standard to aim for in your mixes. Import reference tracks into your DAW at matched volumes to compare balance, EQ, and overall sound. Analyze elements like bass levels, vocal presence, and stereo width.
Mix in Context
Avoid developing the habit of only working in solo mode for extended periods. Make EQ and compression decisions while listening to all tracks together to maintain the context of the mix. This approach ensures that your mix sounds great with all elements playing.
Take Frequent Breaks
Prevent ear fatigue by resting your ears every hour or after major mix adjustments. Taking breaks helps you return with a fresh perspective to catch issues that might have been missed. Your ears are your greatest asset; give them the rest they need.
Vocal Mixing Techniques
EQing Vocals
To reduce muddiness in your vocal tracks, apply a high-pass filter cutting below 80-100 Hz. Cut frequencies around 200-500 Hz to diminish muddiness and boost around 3-5 kHz for presence and intelligibility. These adjustments will significantly enhance vocal clarity.
Compressing Vocals
Set appropriate compression settings for your vocals. Start with a compression ratio of 5:1 for pop vocals, adjusting the threshold for around 3-5 dB of gain reduction. Use a fast attack to catch peaks and a medium release to maintain smoothness. This gives your vocals a consistent and professional sound.
Adding Reverb and Delay
Create depth without clutter by using reverb with a pre-delay to maintain vocal clarity. Apply delay subtly to fill spaces without muddying the mix. Reverb and delay can add space and dimension to your vocals when used judiciously.
EQ Techniques
High-Pass Filtering
Clean up the low end by applying high-pass filters on instruments not contributing to bass frequencies, like guitars and vocals. Set cutoff frequency according to the instrument’s range. This simple technique can immediately clear up your mix.
Cut Before Boosting
Use subtractive EQ to identify and remove problematic frequencies using narrow Q cuts. This technique improves clarity without increasing overall level. Subtractive EQ prevents unwanted frequencies from muddying your mix.
Avoid Extreme Boosts
To maintain a natural sound, keep EQ boosts within 3-6 dB and use wider Q settings for more musical boosts. Extreme boosts can make instruments sound artificial and unnatural.
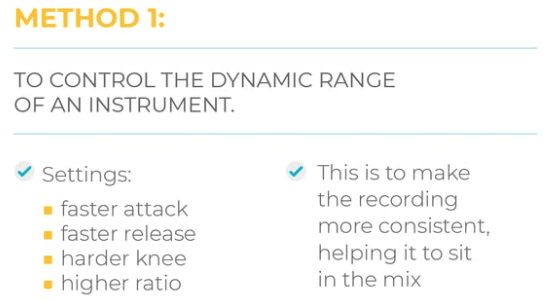
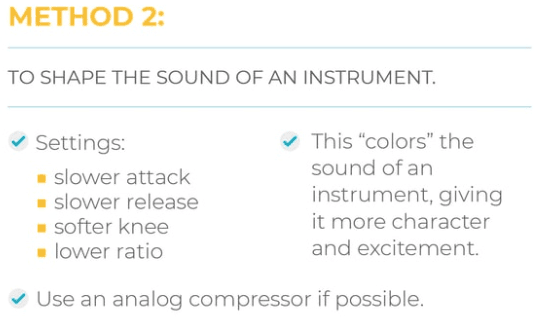
Compression Techniques
Start Subtle
Begin with low compression ratios like 2:1 or 3:1 for gentle dynamic control. This prevents over-compression, which can squash the track’s energy.
Set Proper Attack and Release
For a punchier sound, use a slower attack time. Control sharp transients with a fast attack, and opt for a slower release time to sustain the dynamics smoothly. These settings will help you maintain energy in your track without losing control.
Apply Makeup Gain
Ensure the compressed track maintains its place in the mix by increasing the output (makeup gain) to match the input level after compression. Makeup gain restores lost volume, ensuring your compressed tracks remain audible.
Mixing Drums
Layering Samples
Enhance drum sounds by layering acoustic drum tracks with high-quality samples. This adds consistency and punch to the drum mix. Samples can provide the exact sound you desire when blended correctly.
Using Parallel Compression
Create a powerful drum sound by sending drum tracks to a parallel bus with heavy compression. Blend the compressed signal back with the original to retain dynamics and add thickness. This technique adds punch and excitement to your drums without sacrificing their dynamic range.
EQ Individual Drums
For the kick drum, boost around 60-100 Hz for thump and cut around 200-250 Hz to reduce boxiness. For the snare drum, boost around 2-5 kHz for snap and cut around 800 Hz to remove muddiness. Each drum has its own sweet spot. Carving out space for each helps them shine in the mix.
Mixing Bass
Balance with the Kick Drum
Utilize complementary EQ to ensure the bass and kick drum complement each other. If the kick is dominant at 60 Hz, boost the bass around 100 Hz. Aligning these elements prevents frequency clashes and ensures they work together.
Using Sidechain Compression
Enhance clarity by applying a compressor on the bass track sidechained to the kick drum. This ducking technique reduces the bass level slightly each time the kick hits, preventing frequency clashes.
Splitting Bass Frequencies
Separate bass processing by creating two bass tracks: sub-bass for frequencies below 100 Hz, and mid-bass for frequencies above 100 Hz. Keep sub-bass clean and centered, while applying distortion or chorus to mid-bass for character. This separation allows you to enhance the bass’s character and presence.
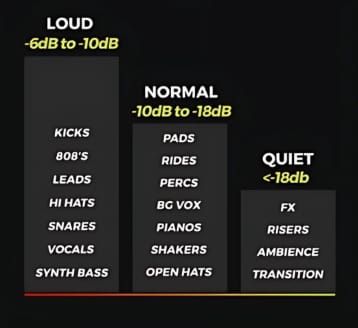
Balancing and Panning
Setting Levels
Start by establishing the rhythm section with drums and bass, then gradually bring in vocals and other instruments. This foundation-first mixing helps maintain focus on the most important elements.
Strategic Panning
Create width by panning instruments to avoid frequency masking. Common panning positions include centering the kick, snare, bass, and lead vocal while panning rhythm guitars, backing vocals, and keyboards left or right by 50-100%. Panning helps instruments stand out in the mix.
Maintain Mono Compatibility
Check your mix in mono to ensure it translates well across all playback systems, including mono devices. Listen for phase cancellation or elements disappearing when summed to mono. Mono compatibility ensures your mix is balanced on all systems.
Finalizing the Mix
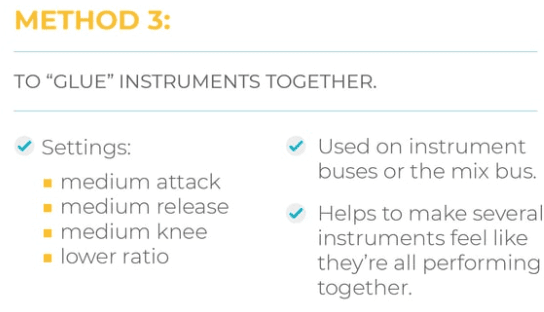
Applying Master Bus Processing
Introduce cohesion and glue by applying light compression and subtle EQ to the master bus. Avoid over-processing to retain dynamic range. Bus processing enhances the consistency of your mix and helps it sound “together.”
Automating Volume
Use volume automation on individual tracks and on the overall mix to enhance the emotional impact and intricacy of the mix by riding vocal levels and bringing instruments in and out smoothly. Automation allows you to fine-tune the dynamics and focus of your mix.
Checking on Multiple Systems
Ensure your mix translates well on different playback devices by listening to it on studio monitors, headphones, car speakers, and smartphones. Take notes on inconsistencies and adjust accordingly. A versatile mix will sound great everywhere and ensure your listeners get the best possible experience.
The path to mastering mixing involves learning this blend of technical and creative skills. Trust your ears and adjust techniques to suit your specific mix. With practice, you’ll develop your own style and workflow. Don’t be afraid to experiment and learn from your mistakes, as that is how you’ll grow as a mixer.